Exam Details
Exam Code
:EX300Exam Name
:Red Hat Certified Engineer (RHCE)Certification
:Red Hat CertificationsVendor
:Red HatTotal Questions
:88 Q&AsLast Updated
:Apr 11, 2025
Red Hat Red Hat Certifications EX300 Questions & Answers
-
Question 1:
SIMULATION
There were two systems:
system1, main system on which most of the configuration take place
system2, some configuration here
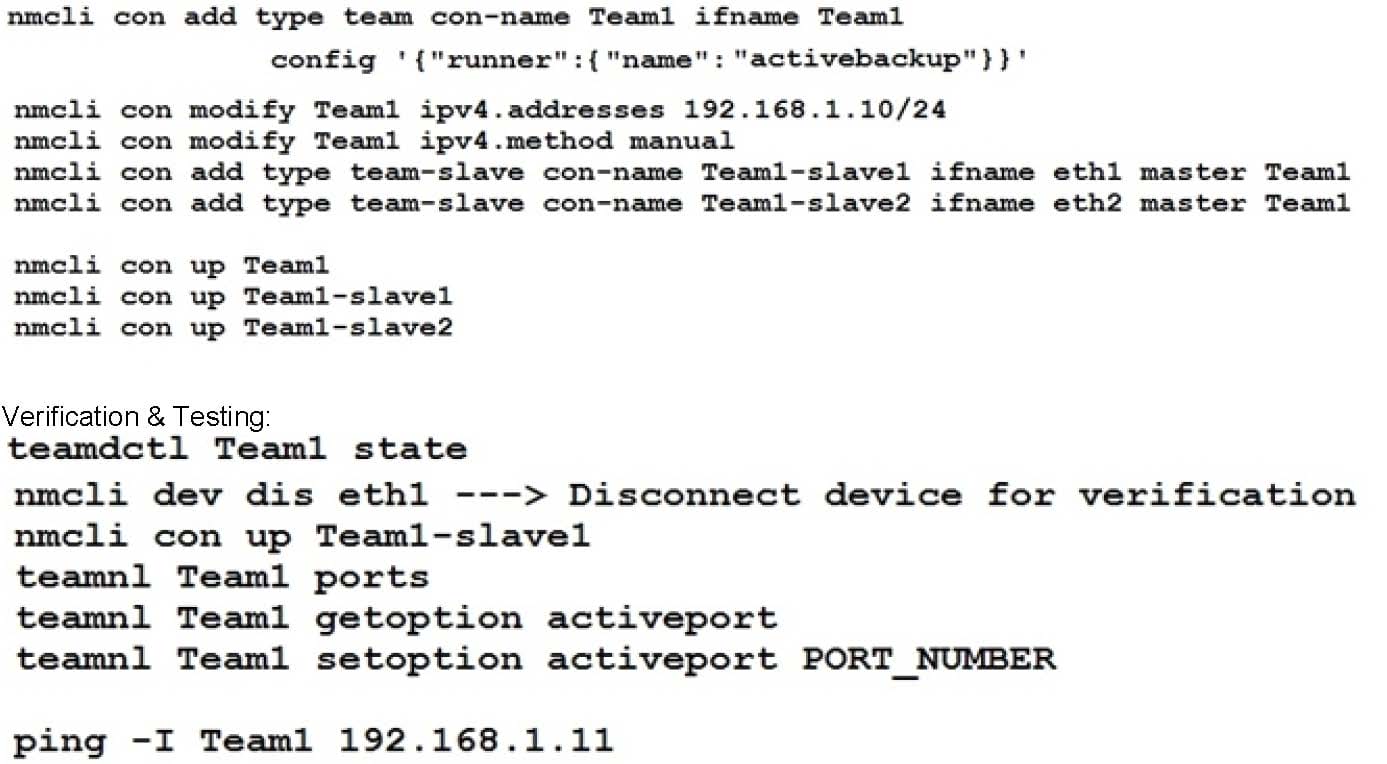
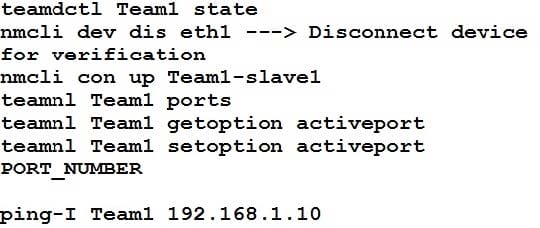
Link aggregation.
Configure your serverX and desktop, which watches for link changes and selects an active port for data transfers.
serverX should have the address as 192.169.X.10/255.255.255.0
desktopX should have the address as 192.168.X.11/255.255.255.0 (Note: where X is your station number)
-
Question 2:
SIMULATION
There were two systems:
system1, main system on which most of the configuration take place
system2, some configuration here
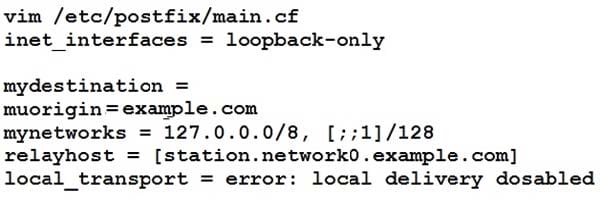
SMTP Configuration.
Configure the SMTP mail service on serverX and desktopX which relay the mail only from local system through station.network0.example.com, all outgoing mail have their sender domain as example.com. Ensure that mail should not store locally.
Verify the mail server is working by sending mail to a natasha user.
Check the mail on both serverX and desktopX with the below URL
http://station.network0.example.com/system1 http://station.network0.example.com/system2
-
Question 3:
SIMULATION
There were two systems:
system1, main system on which most of the configuration take place
system2, some configuration here
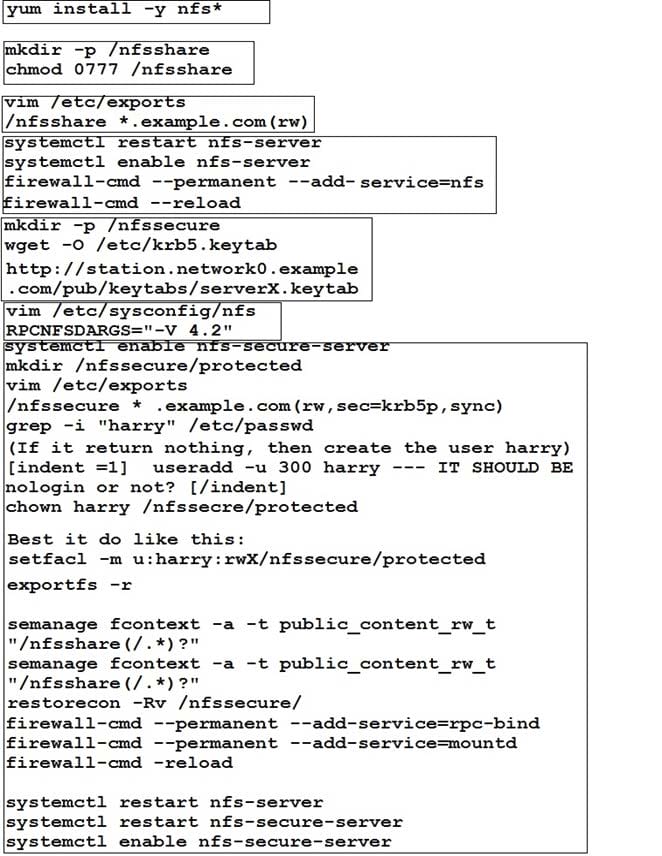
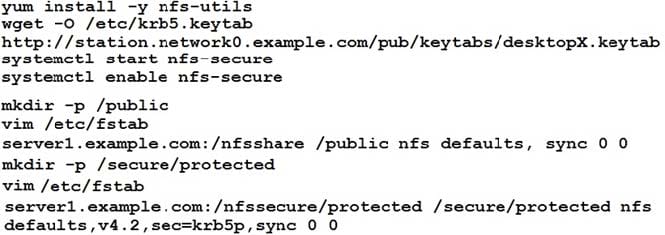
NFS server.
Configure serverX with the following requirements
Share the /nfsshare directory within the example.com domain clients only, share must be writable
Share the /nfssecure, enable krb5p security to secure access to the NFS share from URL http://
station.network0.example.com/pub/keytabs/serverX.keytab
Create a directory named as protected under /nfssecure
The exported directory should have read/write access from all subdomains of the example.com domain
Ensure the directory /nfssecure/protected should be owned by the user harry with read/write permission
-
Question 4:
SIMULATION
There were two systems: system1, main system on which most of the configuration take place
system2, some configuration here
Configure NFS mount.
Mount /nfsshare directory on desktopX under /public directory persistently at system boot time.
Mount /nfssecure/protected with krb5p secured share on desktopX beneath /secure/protected provided with keytab http://station.network0.example.com/pub/keytabs/desktopX.keytab
The user harry is able to write files on /secure directory
-
Question 5:
SIMULATION
There were two systems:
system1, main system on which most of the configuration take place
system2, some configuration here
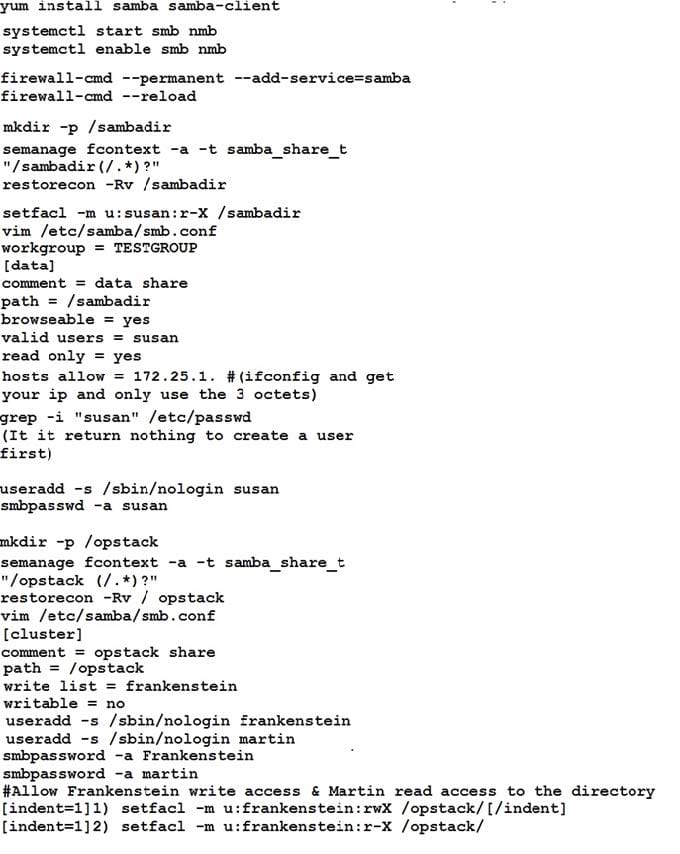
Configure smb access.
Share the /sambadir directory via SMB on serverX
Your SMB server must be a member of the TESTGROUP workgroup
The share name must be data
The data share must be available to example.com domain clients only
The data share must be browseable
susan must have read access to the share, authenticating with the same password “password”, if necessary
Configure the serverX to share /opstack with SMB share name must be cluster
The user frankenstein has readable, writeable, accessable to the /opstack SMB share
Both users should have the SMB passwd “SaniTago”
-
Question 6:
SIMULATION
There were two systems:
system1, main system on which most of the configuration take place
system2, some configuration here
Smb multiuser mount
Mount the samba share /opstack permanently beneath /mnt/smbspace on desktopX as a multiuser mount.
The samba share should be mounted with the credentials of frankenstein.
-
Question 7:
SIMULATION
There were two systems:
system1, main system on which most of the configuration take place
system2, some configuration here
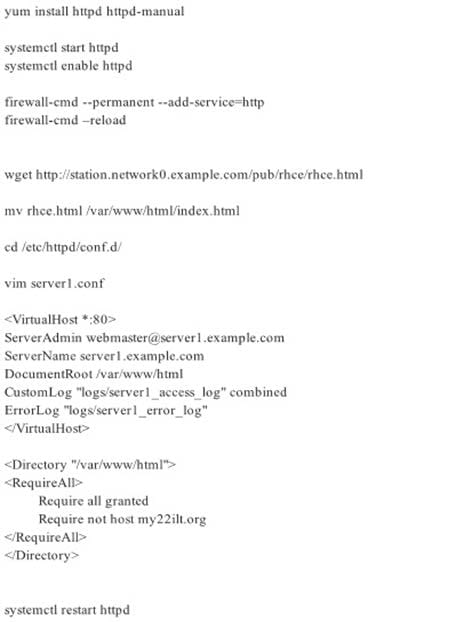
Webserver.
Implement a webserver for the site http://serverX.example.com
Download the webpage from http://station.network0.example.com/pub/rhce/rhce.html
Rename the downloaded file in to index.html
Copy the file into the document root
Do not make any modification with the content of the index.html
Clients within my22ilt.org should NOT access the webserver on your systems
-
Question 8:
SIMULATION
There were two systems:
system1, main system on which most of the configuration take place
system2, some configuration here
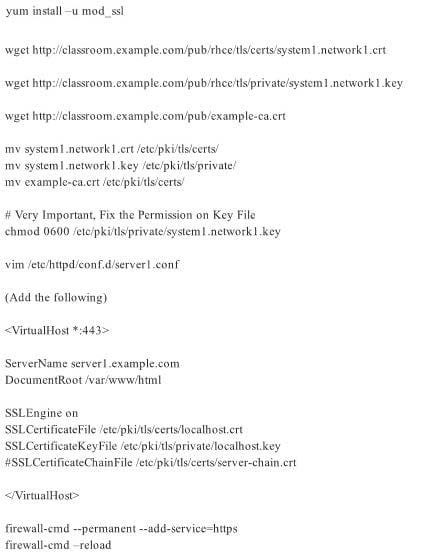
Secured webserver.
Configure the website https://serverX.example.com with TLS
SSLCertificate file http://classroom.example.com/pub/rhce/tls/certs/system1.networkX.crt
SSLCertificatekeyfile http://classroom.example.com/pub/rhce/tls/private/system1.networkX.key
SSL CA certificate file http://classroom.example.com/pub/example-ca.crt
-
Question 9:
SIMULATION
There were two systems:
system1, main system on which most of the configuration take place
system2, some configuration here
Webpage content modification.
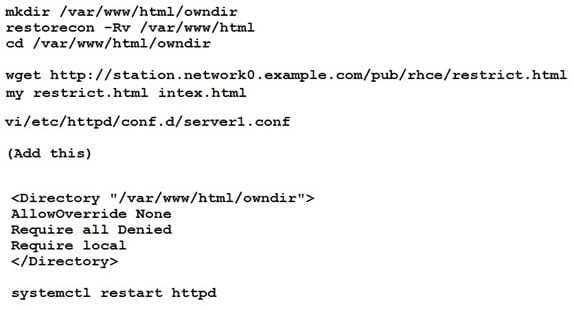
Implement website for http://serverX.example.com/owndir
Create a directory named as “owndir” under the document root of webserver Download http://station.network0.example.com/pub/rhce/restrict.html
Rename the file into ondex.html
The content of the owndir should be visible to everyone browsing from your local system but should not be accessible from other location
-
Question 10:
SIMULATION
There were two systems:
system1, main system on which most of the configuration take place
system2, some configuration here
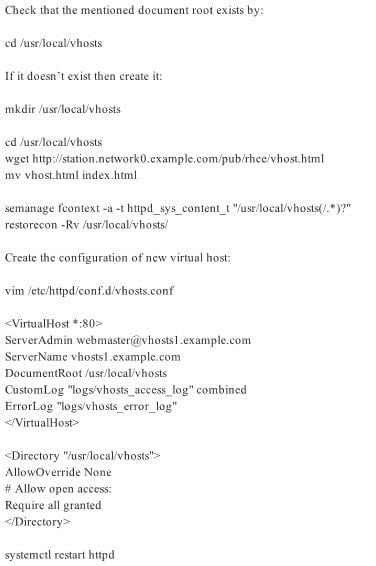
Virtual hosting.
Setup a virtual host with an alternate document root.
Extend your web to include a virtual for the site http://vhostsX.example.com
Set the document root as /usr/local/vhosts
Download http://station.network0.example.com/pub/rhce/vhost/html
Rename it as index.html
Place this document root of the virtual host
Note: the other websites configures for your server must still accessible. vhosts.networkX.example.com is already provided by the name server on example.com
Related Exams:
EX200
Red Hat Certified System Administrator (RHCSA)EX294
Red Hat Certified Engineer (RHCE)EX300
Red Hat Certified Engineer (RHCE)EX318
Red Hat Certified Specialist in Virtualization ExamEX407
Red Hat Certified Specialist in Ansible AutomationEX447
Red Hat Certified Specialist in Advanced Automation: Ansible Best PracticesRH033
Red Hat Linux EssentialsRH133
Red Hat Linux System AdministrationRH202
Red Hat Certified Technician on Red Hat Enterprise Linux 5 (Labs)RH302
Red Hat Certified Engineer on Red Hat Enterprise Linux 5 (Labs)
Tips on How to Prepare for the Exams
Nowadays, the certification exams become more and more important and required by more and more enterprises when applying for a job. But how to prepare for the exam effectively? How to prepare for the exam in a short time with less efforts? How to get a ideal result and how to find the most reliable resources? Here on Vcedump.com, you will find all the answers. Vcedump.com provide not only Red Hat exam questions, answers and explanations but also complete assistance on your exam preparation and certification application. If you are confused on your EX300 exam preparations and Red Hat certification application, do not hesitate to visit our Vcedump.com to find your solutions here.
